
 This website explains how you can add simulated muzzle flashes
to your home movies, using software that's available FREE online!
You'll learn where to find the software, tips on using it, and info
on how to draw your own authentic looking muzzle flashes.
These methods can be applied to toy pistols, rifles, shotguns or
machine guns. You can even have a banana fire a few rounds!
So grab some toy guns and go film some good action footage.
Then have fun adding your own custom made muzzle flashes!
THE SOFTWARE:
Begin by downloading the following programs. Play around with each
of them untill you become familiar with their various functions...
WINDOWS MOVIE MAKER
If Microsoft Windows is your operating system, you already have the
free Windows Movie Maker installed on your computer (sorry, Mac users).
GIMP
Gimp is a free image editor that's very easy to use. (Note: You may need
to install the correct Runtime Environment before installing the editor.)
LIGHT ARTIST
This easy to use freeware helps simulate flashes of light.
PARTICLE ILLUSION
This software is optional. It's not freeware, but you can use it for 30 days
with no restrictions, and that's enough time to learn to use it, and make a
film or two. (You can purchase this software for around 99 dollars.)
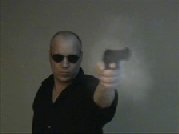
LET'S GO SHOOTIN'...
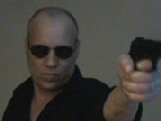
We'll use Windows Movie Maker for our initial editing. Begin by finding the frame
you want to add a flash to. The actor should jerk his arm back as though the
weapon is pushing his arm back when firing. This should result in several frames
with the weapon in focus and then a frame where it's suddenly out of focus as
the actor's arm jerks back. Use the last sharp frame before the motion blur begins.
In Window Movie Maker, make a cut on that last sharp frame. Now use the screenshot
button to make a copy of that particular frame (we'll call it shot1). After you've saved
a copy of the frame, advance the clip one frame (you should now see the first blurred
frame) and make another cut. You have now isolated the frame being altered. Give
the project a name in Movie Maker and SAVE the project. Then zoom in so you
can select the frame being altered and delete it from the Movie Maker clip.
You can now add a muzzle flash to the image you saved (shot1), using any or all of the
methods described below. Then use Movie Maker to insert the new image in place of the
original image you deleted. After inserting the new image, advance the Movie Maker one
frame forward and make a cut. Delete all of the new image to the right of the cut,
leaving just one frame of the new image. Your muzzle flash should now appear in the
film for just a moment, as though the weapon was actually fired!

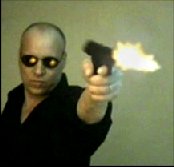
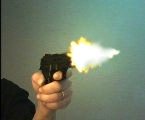
This version isn't the fanciest, but it can be done VERY quickly and easily, using
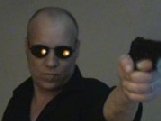
just Light Artist. My method is to place a light source (omni type) at the end of
the gun barrel and then expand the light to cover the entire frame. This will give
the illusion of a flash of light in the room. Choose an appropriate color (I used
a light yellow). Next add a second light source (leaving the color white) slightly
in front of the gun barrel and adjust the intensity untill you see a white circular
glow appear. Save the image and use Movie Maker to insert it into your film.
And that's it! You now have a simple but startling muzzle flash effect!
You should experiment with different settings in Light Artist to see
what you like best, since it gives you lots of creative control.

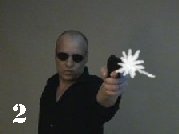
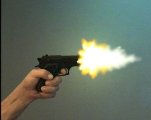
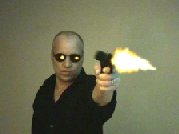
For version 2 we'll use Gimp to draw a muzzle flash, and then we'll brighten it up with Light Artist.
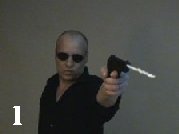
Start by opening shot1 in Gimp. For my example I'm using the brush called 'Circle Fuzzy (05)' set at
75% transparency. Begin with pure white and draw a line issuing from the gun barrel (we'll call this
the bullet trail). This line doesn't need to be straight but it does need to follow the direction the bullet
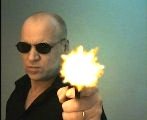
would go, as shown in Figure 1. Next draw a burst around the end of the gun barrel as shown in
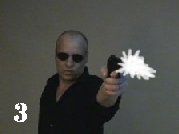
Figure 2. Go over this a few times so the center is solid white. Then make several jagged lines radiating
from the trail outward, as shown in Figure 3. The flash should get narrower as it moves away from
the gun barrel, and the general shape of the flash should be something like a pine tree. Again, go over
the middle area untill it's a solid white (real flashes over-expose the film and look white when filmed).
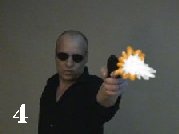
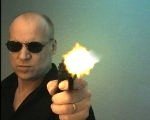
To make the flash look more like fire, select a light orange ( I used ff9a16) and draw around
the edge of the burst (leaving the white area in the middle of the flash uncovered, as shown
in Figure 4. Use white to blend the inside edge of the orange as shown in Figure 5. Next use
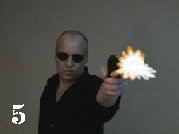
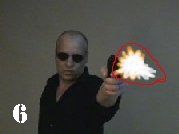
the lasso tool to select the general area around the flash, as shown in red in Figure 6.

Select Filters/Blur/Gaussian Blur. Set the radius to 3 and apply the blur to the selected
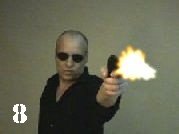
area as shown in Figure 7. To finish this version, save the image and reopen it in Light Artist.
Add a light source (omni type) over the flash and expand it to cover the entire frame. Choose
an appropriate color (such as light yellow) to simulate a flash of light in the room, as shown
in Figure 8. If you wish, add a second light source over the flash to further brighten it.
Save this image and use Movie Maker to import it back into your film.
A FEW TIPS:
The shape of the muzzle flash will depend upon the angle at which we are viewing the weapon.
If seen from the front, the trail may not be visible and the burst will appear more round.
If seem from the side, the trail is longer and the burst is forshortened (more of an oval).
For a shotgun you might have the flash grow wider instead of narrower as it leaves the barrel.
For a machine gun make the flash longer and thinner, with a star shaped burst.
Study photographs of real muzzle flashes and try to duplicate their characteristics.
You can modify the methods described here to create your own style of flash!

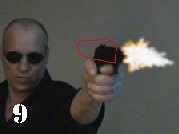

Now that you know how to create the basic flash, here are a few tricks you can include to
further strengthen the illusion. Using Gimp, begin by drawing a muzzle flash as described in
version 2. Since our character has an automatic pistol, we can simulate the 'blowback'. To
do so, use the lasso tool to select the back part of the pistol and a little of the empty area
behind it, as shown in Figure 9. Copy this area and paste a little further back than it's
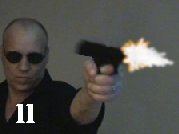
original position, as shown in Figure 10. While the area is still selected, we'll add a little
motion blur so it looks natural, as shown in Figure 11. Select Filters/Blur/Motion Blur. Set
the length to around 10 and use the preview to determine the proper angle. Apply the blur and
your toy pistol will now seem to have the same slide action as a real automatic weapon.
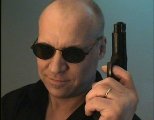
Another good trick is to look for any reflective items in the shot (such as the character's
sunglasses) and airbrush some highlights into them. For this, draw an orange spot on each lens
(using the same brush and opacity as before) and then draw a smaller white spot in the center
of each orange spot. Look for places to add reflections whenever possible.
To complete version 3, use Light Artist as described in version 2 to add a simulated glow to your
image. Save this image and use Movie Maker to import it back into your film.

A final thing we can do to improve our muzzle flash is to use Particle Illusion to simulate
smoke from the weapon. The software is too complex to be adequately described here, but it
has it's own instructions and it's lots of fun to play with while you're learning to use it.
In addition to the clouds of smoke shown here, Particle Illusion can be used to simulate
squibs, bullet hits on walls, fire, sparks, and even some explosions.

Below is an example of simulated machine gun fire. This can be made in the same way as the
handgun flashes, except that you'll need to use Movie Maker to seperate several individual
frames in a row,and then draw flashes on half of them. The clip shown below includes
roughly 40 muzzle flashes (and took about five hours to complete).


A FINAL NOTE:
The other crucial element in a good muzzle flash effect is SOUND.
Find a good sound (I recommend looking around SoundDogs.com)
and then use Movie Maker to apply the sound exactly where the
flash occurs. Remember that the sound of gunfire should seem
loud and harsh in your final film.
And that concludes this crash course in simulated weaponry.
Try experimenting with things to create your own favorite
muzzle flash methods, and HAVE FUN!
FILM MAKING RESOURCES:
If you're interested in making films, I highly recommend the following sites...
Movie Maker Forum (all about Windows Movie Maker software)
Windows Movie Maker Archives (various additional files)
Upload Sites Compared (plus Movie Maker files)
GIMP (a great free image editor)
Particle Illusion (amazing effect software, free for 30 days)
LSmaker (freeware for light sabre effects)
WAX 2.0 (chroma key freeware, great for bluescreen)
Zero Budget Filmmaking (view their whole series)
MicroFilmmaker Magazine (handy tips and tricks)
Digital Cinema Pictures (some great info)
Raindance Indie Tips (nice list of topics)
Mega Movie Making Guide For Kids (actually great for all ages)
NBFX (clever no-budjet effects ideas)
MightyCoach Video Training (some fun tricks)
Camcorder Masterclass (very detailed info)
Brown Cow Studios (great FX ideas here)
Moondance Filmmaker Tips (advice on film festival submissions)
Sounddogs.com (Huge list of free sound effects)
Eddie's Trick Shop (a great theatrical makeup source)
If you have any comments or questions, you're
welcome to contact me at the following address:
graaargh@aol.com
...and Happy Filmmaking!